Ali's Tutorials » Understanding Photoshop

Step 1
Photoshop is an awesome piece of software and the de-facto standard for editing image files.
But as many of you may know, Photoshop is also excellent for drawing and painting! Sure, there may be software out there that has been specifically developed for manga drawing (MangaStudio) or painting (Corel Painter) which is also less expensive than PS, BUT once you try (newer versions of) Photoshop you will certainly be amazed by its user-friendliness, its wide array of features and the GPU support, which makes working on your images very comforable!
But with great power comes a steep learning curve!
Understanding Photoshop might take a bit of effort. So today, we will try to get an overview over how Photoshop is structured, its core functionality and explore the features that will probably be most relevant to your work as an artist!
Step 2
Let's start with a bird's eye view of Photoshop.
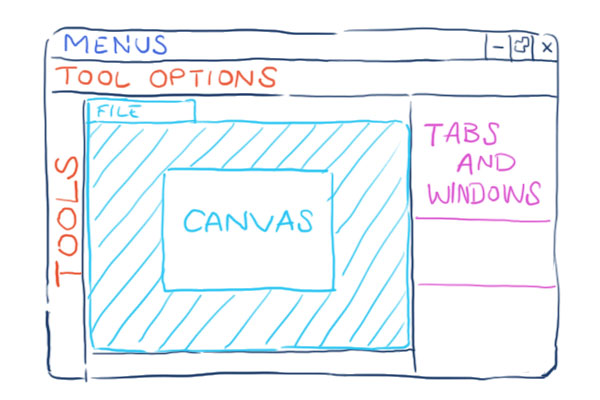
You'll see that its basic structure is actually quite simple and straight-forward. At the top you have your obligatory _menus_ and the big space in the middle is your file window or canvas.
To the left is your tool palette and right above it are the tool options, which differ depending on the tool you have currently selected.
To the right you have a customizable set of windows and tabs for quick access to all of Photoshops functionality.
Step 3
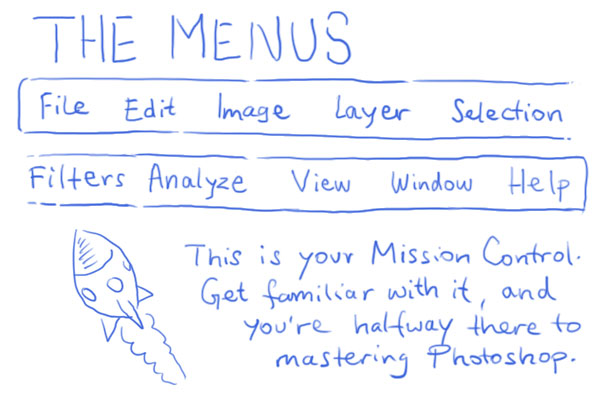
The menus in Photoshop allow you to configure and access everything that the software has to offer. Sure, it might feel a bit overwhelming at first, but once you understand the different categories, it will be easy to find whatever it is that you are looking for!
Step 4
First on the list is the File menu.
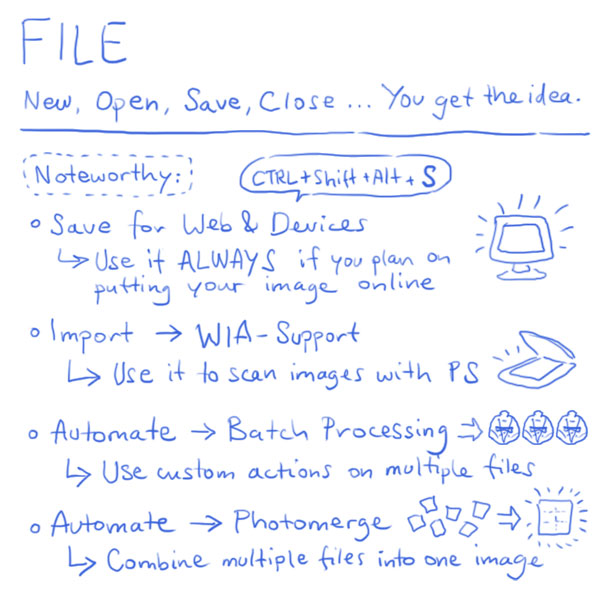
This should be a familiar sight, since nearly every software has a file menu where you can create, open, save and close files.
In Photoshop, you also have an option to save for Web and Devices. You might be hesitant to use it at first, but trust me, the name says it all.
Whenever you want to save an image for the web, use this option! It can help you to drastically reduce the image size while at the same time giving you a lot of settings to keep the quality of the image.
Step 5
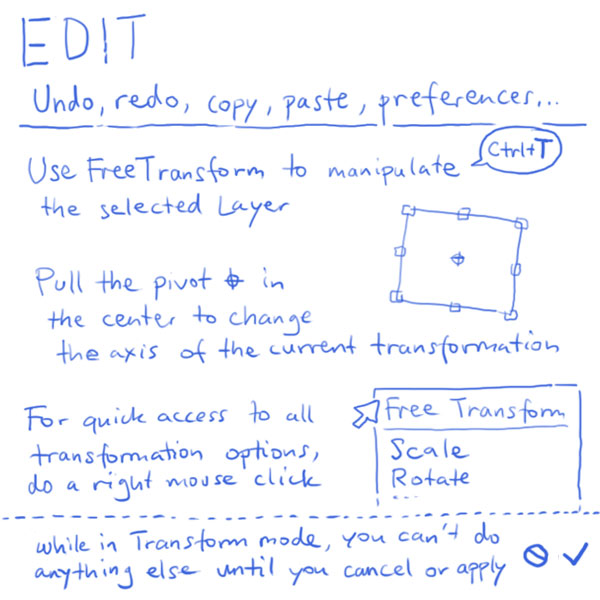
The Edit menu allows you to manipulate stuff in Photoshop, be it selections, layers or Photoshop settings.
If you're new to PS, you may find the Undo function a bit peculiar. Pressing CTRL + Z undoes the last step, but pressing it again redoes it!
To just keep going back, press ALT+CTRL+Z.
One of the most useful tools in Photoshop is Free Transform.
It helps you in rotating, scaling, moving and distorting your selections and layers.
Once you activate it (CTRL + T), Photoshop will change into Transform mode, which you can exit by pressing ESC or apply by pressing ENTER.
You can manipulate the layer by grabbing the sides of the transform box and pulling them. To quickly change the transform mode, simply press the right mouse button.
Remember that you can also move the pivot point in the center of the transform box to change its axis. Very useful!
Step 6
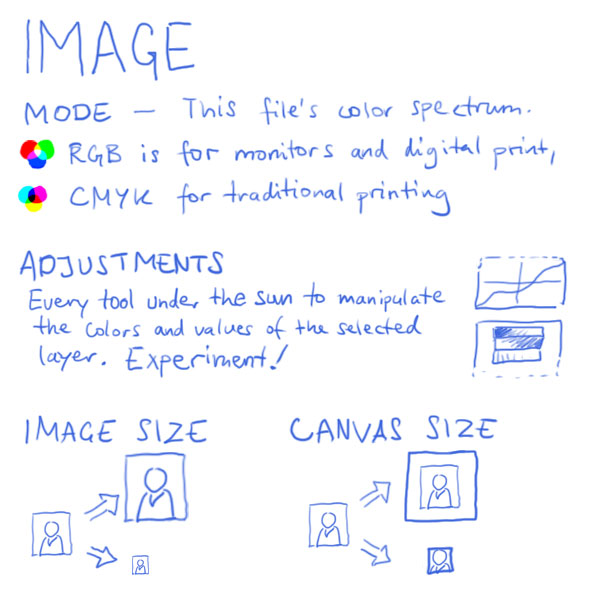
Now, the Image menu is here to help you in manipulating the color modes of your file and making general changes to your image.
If you're creating images for the web, your color mode should almost always be RGB. If you find that you can't apply certain filters or use layers, it's probably because your file is in the wrong color mode.
Going into all of the adjustment options would probably require a week. Suffice to say that here you can find all you need to manipulate the colors of your image. The most powerful adjustment option is arguably curves, which gives you full control of every color value in all three color channels.
Experiment as much as you can with the different options, because that is probably the fastest (and most enjoyable) way of learning how to use them!
Step 7
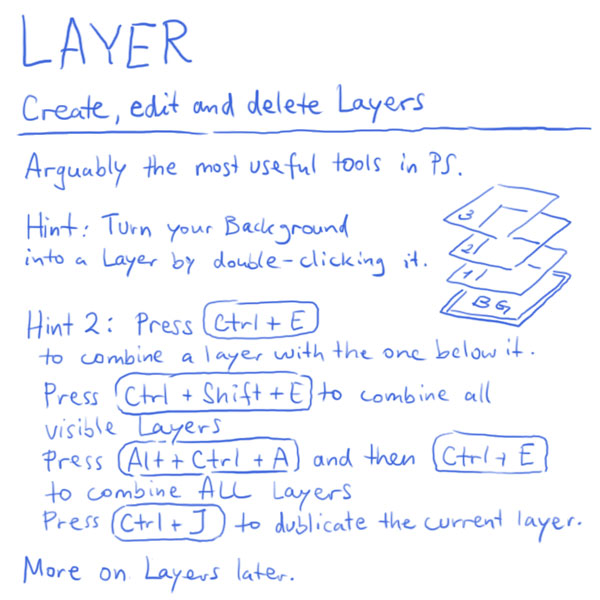
If you're new to digital editing software, you might be wondering what's so great about Layers.
Well, layers offer you the ability to structure your image file into many parts.
For example, in a painting you can have a seperate layer for the distant background, details in the midground and a character in the foreground.
The great thing about this is that you can now change the position of the person in the foreground or change the colors of the background all without affecting the other layers!
In other words, layers keep your images flexible so that you can make changes at any time to specific parts of it.
Step 8
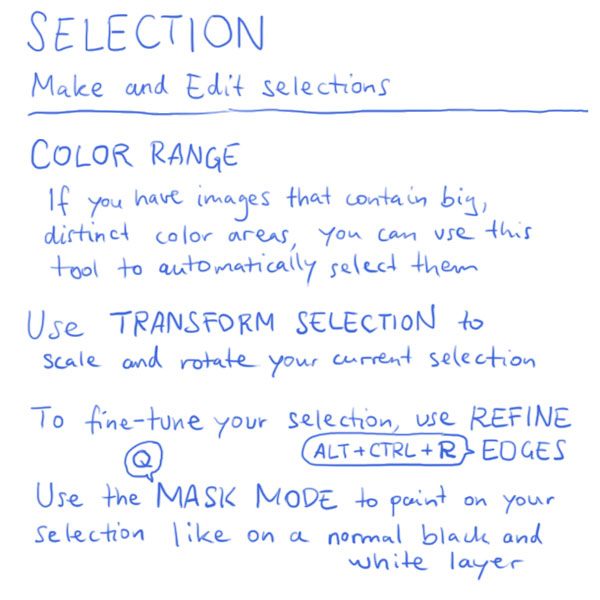
The Selection menu offers you tools to create selections or manipulate existing selections.
Wait, you don't know what selections are? Well, a selection selects certain pixels of you image or layer. You can then manipulate the selected pixels without affecting the rest of the layer.
In other words, it super useful! But with Photoshop CS3 and later the selection tools have grown tremendously. When you have an active selection, as well as a selection tool... selected... you have access to the Refine edge option in your toolbar. This little gem can help you in greatly enhancing your selections, and since PS CS5 you even have an amazing magical brush that turns rough selections into very accurate and detailed ones!
Step 9
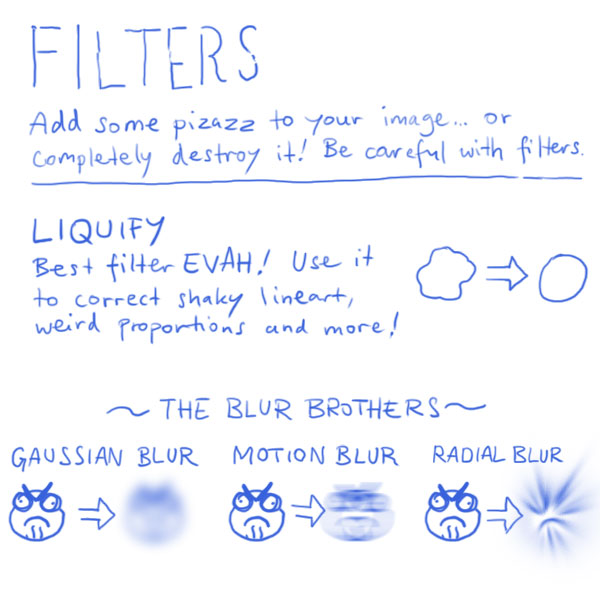
Okay, let me say it right away: Filters are the most over-used thing ever in Photoshop.
Now, that doesn't mean you shouldn't ever use them. But if you're not sure if a filter is necessary in some particular case, you're probably better off not using it.
That said, SOME filters are insanely cool! Like the Liquify filter. It allows you to smoothly move the pixels in your image, almost without loss in quality. This can be particularly helpful if your lineart is shaky. Just correct if with liquify and no one will ever know!
Step 10
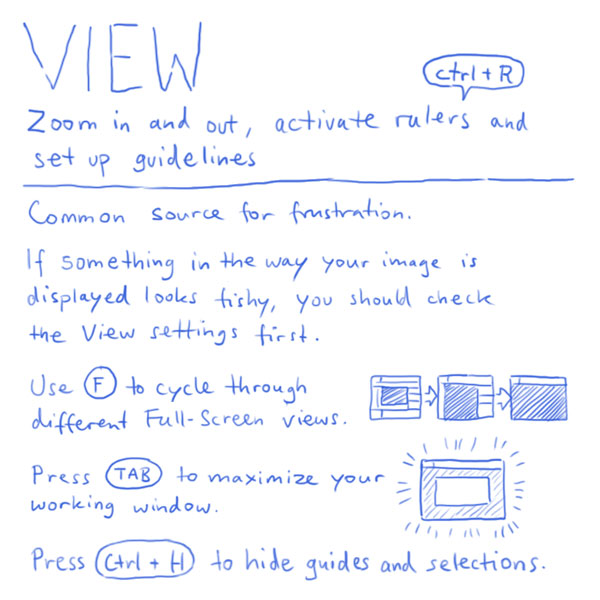
The View menu is the eyes of Photoshop, helping you in navigating in your image file and influencing the way your preview works.
In practice, you will rarely need to use this menu, because you can very comfortably zoom in and out of your image by holding CTRL + SPACE and your left mouse button and then moving your mouse up or down.
(You can also of course use CTRL + PLUS or MINUS or holding ALT and using the mouswheel)
Step 11
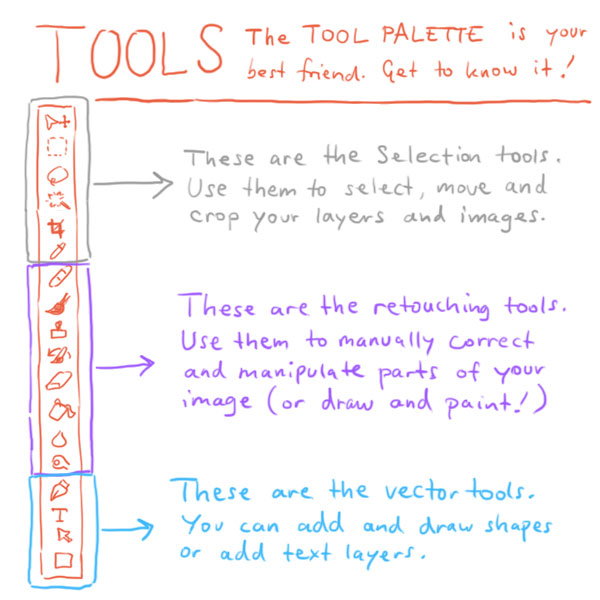
Alright, now that we have a better idea of the menus in Photoshop, it's time to give the Tools a deeper look.
Your tool palette usually floats to the left of your screen, but you can certainly move it to the right side or some other place if you wish.
The tools are structured in two levels; the one level you can see, the other one you can't. Notice the little arrow at the bottom left of some tool icons?
Click and hold on one of them with your mouse and you will see a different set of tools pop out.
These are usually variations of the tool icons that you can see.
If you are familiar with the shortcuts for the tools, you should know that you can cycle within a set by holding SHIFT and pressing a key for a particular tool.
For example, you can select the bucket tool by pressing G once, and by pressing SHIFT + G you can select the gradient tool.
Step 12
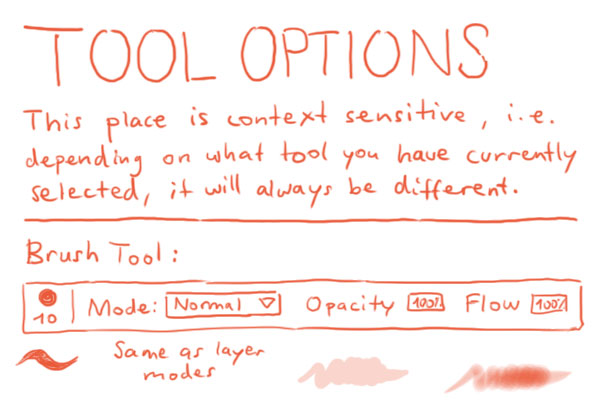
The Tool Options help you in fine-tuning the tool that you have currently selected.
For example, you can change the size and shape of your brush, the opacity, flow, etc. when you have the brush tool selected.
Step 13
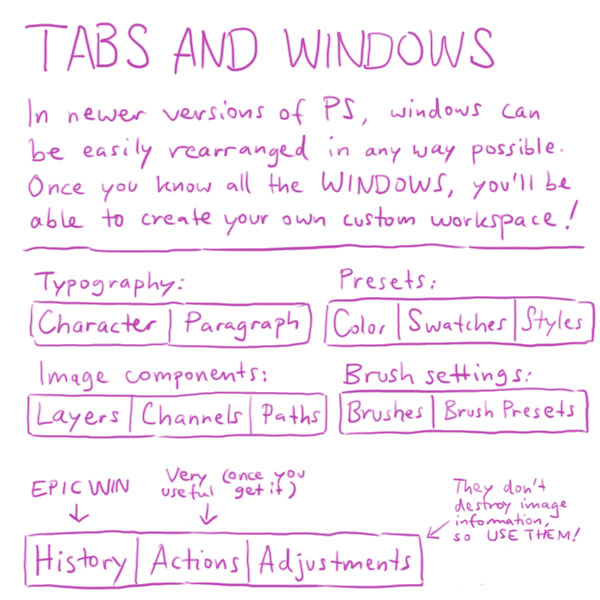
Usually to the right of your screen are a number of different 'tabs and windows'.
These give you quick access to things that you can also change through the menus, but not quite as quickly and effeciently!
You should definitely give all windows a closer look and see what they have to offer. You will find that there probably are a few that make your life a whole lot easier. You can rearrange them in a way that fits your working style and save them in a workspace!
Step 14
Alright, now that we know how Photoshop is put together, we can venture forth and explore some of its functions that you should know about to effectively work with PS.
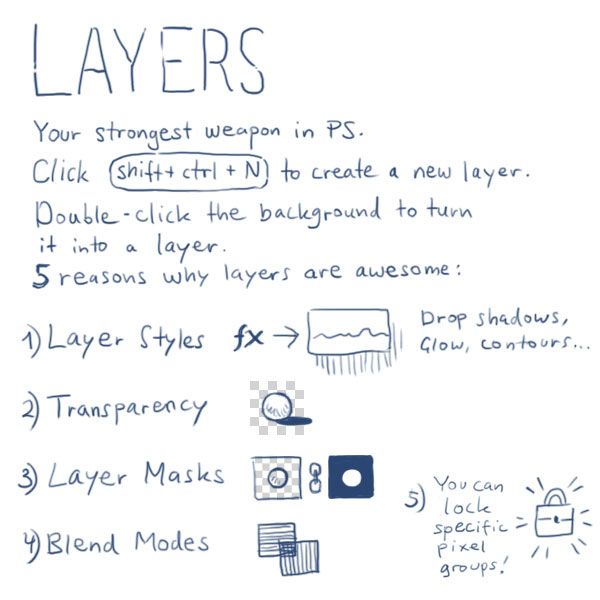
We have already acquired a general idea of how layers work and how they are helpful to us, but there are many facettes worth mentioning.
You probably know that you can easily name and rearrange your layers. But you can also select multiple layers and group them by pressing CTRL + G. You can even group groups!
This is an excellent method of keeping your image files nice and tidy even if you have hundreds of layers.
With newer versions of Photoshop, you have a pretty amazing feature know a _adjustment layers_. These layers do the same things that your ol' regular image adjustments do, except without permanently changing the pixels in your image! This means that you can always change, reorder or delete these layers without affecting the underlying layers!
Step 15
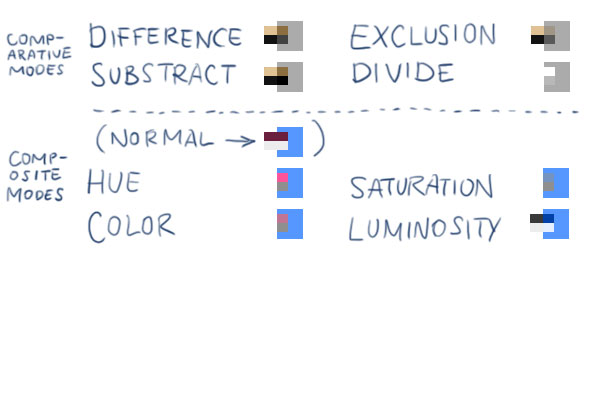
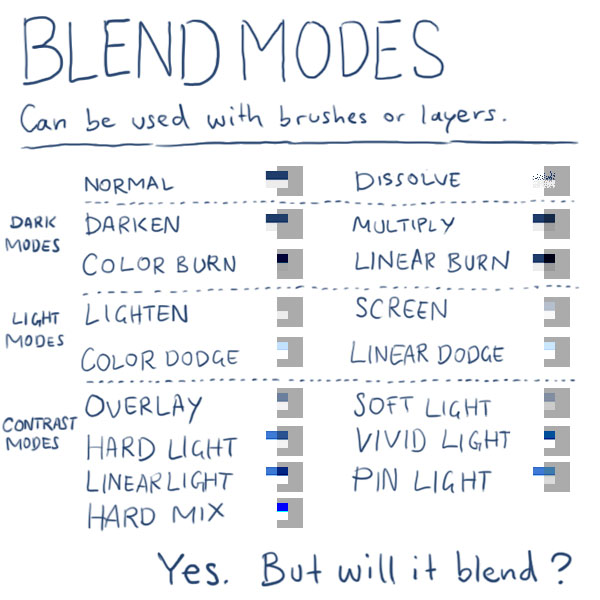
If you look in your layers palette, you will notice a drop-down box in its top left corner that usually says "normal".
Well, you can change that! In Photoshop you can choose between dozens of different Blend Modes to change how a particular layer should affect the underlying layers.
Blend modes are incredibly useful, but can be a bit confusing.
To help you in understanding how they work and how they are categorized, I invite you to explore the graph to the left and experiment with different blend modes on your own.
Outro
That's it for this tutorial!
Hopefully you have gained a better understanding of how Photoshop ticks.
Now go out and 'shop!
Comments
No comments yet. Be the first to share your thoughts!
You need to be logged in to write comments.
